Also removed some of the older no longer relevant docs

Change-Id: Ic75e70c2ff008725971e6395a8286a11d1646ed2
6.8 KiB
Airship UI Developer's Guide
Prerequisites
- Go v1.13 or newer
Getting Started
Clone the Airship UI repository and build.
git clone https://opendev.org/airship/airshipui
cd airshipui
make
make examples # (optional)
NOTE Make will install node.js v12 into your tools directory and will use that as the node binary for the UI testing and launching.
Run the airshipui binary
./bin/airshipui
Authentication
Pluggable authentication methods
The AirshipUI is not designed to create authentication credentials but to have them supplied to it either by a configuration or by an external entity. The expectation is that there will be an external URL that will handle authentication for the system which may need to be modified or created. The endpoint will need to be able to forward a bearer token, basic auth or cookie data to the Airship UI backend service.
To configure the pluggable authentication the following must be added to the $HOME/.airshipui/airshipui.json file:
"authMethod": {
	"url": "<protocol>://<host:port>/<path>/<method>"
}
Note: By default the system will start correctly without any authentication urls supplied to the configuration. The expectation is that AirshipUI will be running in a minimal least authorized configuration.
Example Auth Server
There is an example authentication server in examples/authentication/main.go. These endpoints can be added to the $HOME/.airshipui/airshipui.json and will allow the system to show a basic authentication test.
- Basic auth on http://127.0.0.1:12321/basic-auth
- Cookie based auth on http://127.0.0.1:12321/cookie
- OAuth JWT (JSON Web Token) on http://127.0.0.1:12321/oauth
To start the system cd to the root of the AirshipUI repository and execute:
go run examples/authentication/main.go
Example Auth Server Credentials
- The example auth server id is: airshipui
- The example auth server password is: Open Sesame!
Behind the scenes
Communication with the backend
The UI and the Go backend use a websocket to stream JSON between the ui and the backend. The use of a websocket instead of a more conventional HTTP REST invocation allows the backend to notify the UI of any updates, alerts and information in real time without the need to set a poll based timer on the UI. Once the data is observed it can be transformed and moved to the UI asynchronously.
The UI will initiate the websocket and request data. The backend uses a function map to determine which subsystem is responsible for the request and responds with configuration information, alerts, data and pagelets. The pagelets are rendered templated HTML documents that the Go backend amends with the data requested from the UI. What the user sees is a combination of the base index.html with data enhanced pagelets placed in the appropriate HTML Content Division with the onclick functions either predefined with existing functions or bound post insertion into the HTML Document Object Model.
AirshipUI interaction
Communication with the dashboards
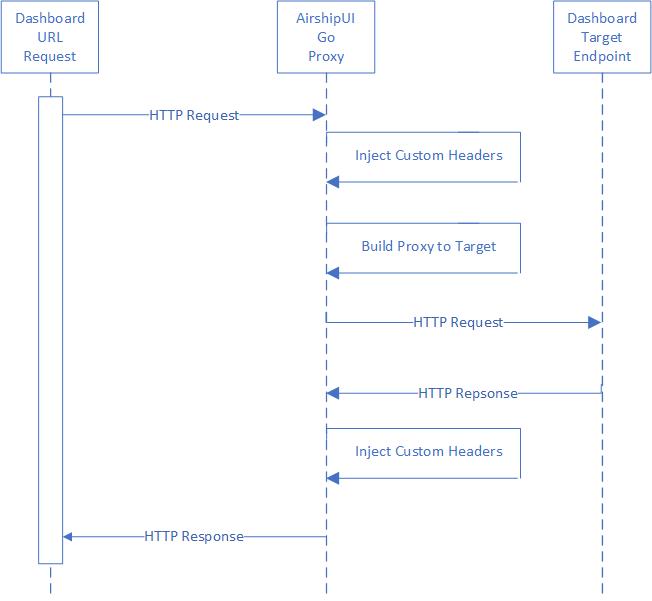
Dashboards may or may not be generally available for end users based on the cluster the AirshipUI is deployed to. If access to the endpoint is controlled in a way that is not easy to manipulate or if a Single Sign On approach is necessary the AirhshipUI provides the ability to proxy the targeted dashboard.
AirshipUI proxy interaction
Appendix
Minikube
Minikube runs a single-node Kubernetes cluster for users looking to try out Kubernetes or develop with it day-to-day. Installation instructions are available on the kubernetes website: https://kubernetes.io/docs/tasks/tools/install-minikube/). If you are running behind a proxy it may be necessary to follow the steps outlined in the How to use an HTTP/HTTPS proxy with minikube website.
Docker on Windows
The default Docker install on windows will attempt to enable Hyper-V. Note: if you are using VirtualBox it cannot coexist with Hyper-V enabled at the same time. To build docker images you will have to shut down VirtualBox and enable Hyper-V for the build. You will need to disable Hyper-V to use VirtualBox after the images have been built.
Issues with npm / npx
If you're running behind a corporate proxy this is the workaround. This is intended to be run in the web directory:
npx cross-env ELECTRON_GET_USE_PROXY=true GLOBAL_AGENT_HTTPS_PROXY=http://<proxy_host>:<proxy_port> npm install
If your corporate proxy terminates the SSL at the firewall you may also see this error:
$ npm install .
npm WARN monaco-editor-samples@0.0.1 No repository field.

npm ERR! code UNABLE_TO_GET_ISSUER_CERT_LOCALLY
npm ERR! errno UNABLE_TO_GET_ISSUER_CERT_LOCALLY
npm ERR! request to https://registry.npmjs.org/yaserver/-/yaserver-0.2.0.tgz failed, reason: unable to get local issuer certificate

npm ERR! A complete log of this run can be found in:
npm ERR!     /home/user/npm-cache/_logs/2020-06-16T18_19_34_581Z-debug.log
If you normally have to install a certificate authority to use the corporate proxy you will need to instruct NPM to use it:
export NODE_EXTRA_CA_CERTS=/<path>/<truststore>.pem
Issues unicode characters not showing up
Some of the UI contents are derived from standard unicode characters. If you are running the UI on a linux based OS it is possible that you will need to install noto fonts either by the system's package manager or directly from https://www.google.com/get/noto/help/install/.
Optional proxy settings
Environment settings for wget or curl
If your network has a proxy that prevents successful curls or wgets you may need to set the proxy environment variables. The local ip is included in the no_proxy setting to prevent any local running process that may attempt api calls against it from being sent through the proxy for the request:
```
export http_proxy=<proxy_host>:<proxy_port>
export HTTP_PROXY=<proxy_host>:<proxy_port>
export https_proxy=<proxy_host>:<proxy_port>
export HTTPS_PROXY=<proxy_host>:<proxy_port>
export no_proxy=localhost,127.0.0.1,<LOCAL_IP>
export NO_PROXY=localhost,127.0.0.1,<LOCAL_IP>
```

